Figure template · Lab Apparatus · 4:3
Confocal Microscope Optical Path and Detectors
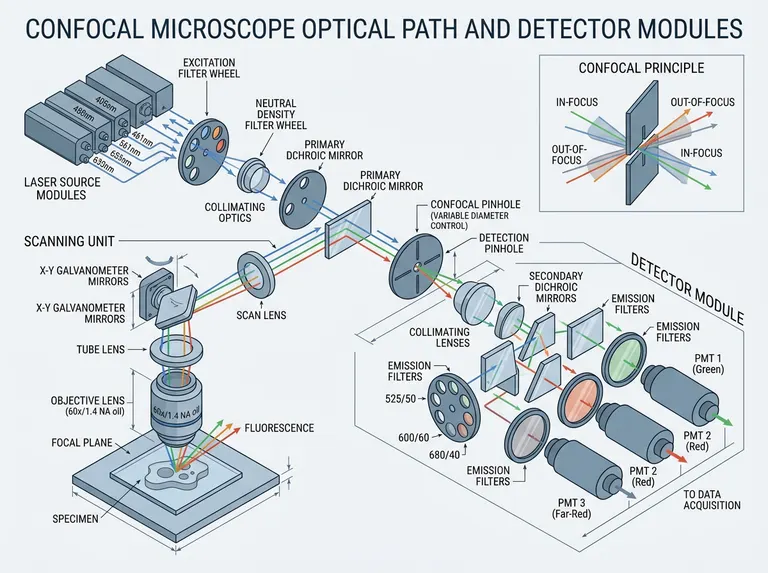
An isometric light path that runs from the laser modules through the filter wheels, primary dichroic, scanning mirrors and objective, then back through the confocal pinhole into a split detector module, with the pinhole principle shown in its own inset.
Prompt
Create a scientific figure about: Confocal microscope optical path and detector modules. Visual style: Clean Vector. Requirements: publication-ready scientific quality, clear labels and directional arrows where appropriate, avoid cartoon or stock-photo look, composition optimized for research papers and academic slides.
What this template is
The figure explains why a confocal microscope sections. Several laser lines are selected by an excitation wheel and attenuated by a neutral density wheel, reflected off the primary dichroic into the galvanometer scanner, and focused by the objective onto the focal plane of the specimen. Emitted fluorescence returns along the same path, passes through the dichroic, and meets a pinhole placed in a plane conjugate to the focal plane, where only in-focus light gets through. Secondary dichroics and emission filters then split the remaining light by band into separate photomultipliers.
Elements to label
Laser module stack
Set the excitation lines side by side with each wavelength printed at its own output, never stacked together.
Excitation and ND wheels
Draw both wheels as discs and mark which aperture the beam is currently passing through.
Primary dichroic
One tilted surface that both reflects excitation and transmits emission, labelled a single time.
Galvanometer scanner
Two mirrors with their swing directions, connected to the scan lens and tube lens as one optical segment.
Objective and focal plane
Print magnification and numerical aperture on the objective and mark the focal plane in the specimen below.
Confocal pinhole
Place the pinhole in the plane conjugate to the focal plane and note that its diameter is adjustable.
Detector module
Secondary dichroics split the beam in stages, each arm carrying an emission filter and one detector named by band.
Pinhole principle inset
A separate corner panel contrasting in-focus rays passing the aperture with out-of-focus rays blocked by it. Keep it in a corner.
Where it is used
- Paper mechanism figure
- Defense slides
- Course handout
- Lab website
What reviewers look for
The pinhole must be conjugate
Confocal sectioning depends on the pinhole sitting in a plane conjugate to the focal plane, on the descanned return path. Let the emission reach the scanner before the aperture, or the inset loses its basis. Mark the conjugate planes if space allows.
Clear the duplicated labels
In the sample the primary dichroic, the scanning mirrors and one detector each carry two captions, and one caption drops a letter. An optical diagram is trusted label by label.
Channels match their filters
If a detector is named by colour, the emission filter in front of it must carry the matching band. The sample repeats a channel name, so number the arms and give each its band.
Pinhole size is a trade-off
Closing the aperture thins the optical section but costs signal, and reviewers ask how many Airy units you used. A line beside the pinhole answers that better than calling it adjustable.
How to use it in Yila
- 1Pick a figure
- 2Describe your subject and the steps to stress
- 3Refine it in chat, then download the PNG
Tips
Do
- Put your own excitation lines, filter bands and objective specification in the prompt so the labels are right the first time.
- For multicolour imaging, colour each detection arm so a reader can follow one channel to its own detector.
- Decide how many detection arms you need before generating; crossing beams multiply fast once the module grows.
Avoid
- Do not draw cell structure in the specimen as well as the full light path; the beam lines disappear behind it.
- Do not let the wavelength captions overlap, as several do in the sample, where the lines can no longer be read.
- Do not mix excitation and emission in one colour; readers trace the return path by its colour change here.
Questions
Can this go straight into a paper?
Use it as a draft imaging schematic. Check the pinhole position, clear the duplicated and misspelled captions, then keep refining it in chat until the line weights and type size match your journal's figure rules. Thin rays print poorly at column width.
Can elements in the figure be changed?
Not element by element, but you can keep refining it by chatting in Yila: cut the number of detection arms, switch to a spinning disc design, add a transmitted-light detector, or flatten the isometric view into a plain beam diagram. Ask for one change per message so the beam geometry stays comparable.
What format is delivered?
An AI-generated PNG in a landscape isometric view. It is not a vector graphic, so check whether small captions such as filter bands survive reduction before you place it in a two-column paper, and ask for a flat version if not. The inset can also move below the path.
Is it free?
Browsing this page and viewing the sample cost nothing. Generating your own version in Yila consumes credits, and a new account receives 2,500 credits, enough to rebuild the path around your own microscope several times over. Collect your edits first so fewer rounds are needed.
Could I adapt it for a two-photon system?
Yes. Ask for a femtosecond source, remove the pinhole, and move the detectors next to the objective for non-descanned collection; the scanner and spectral splitting keep the arrangement they have here. Mention the detector type you use.
Can I keep only the pinhole inset?
Ask for the in-focus and out-of-focus ray panel alone, enlarged to fill the frame. It makes a clean teaching slide for why a confocal microscope can section optically, with the full path kept for a later slide. Larger ray labels help in a lecture room.