Figure template · Cross-section · 4:3
Retinal Layers and Signal Direction Figure
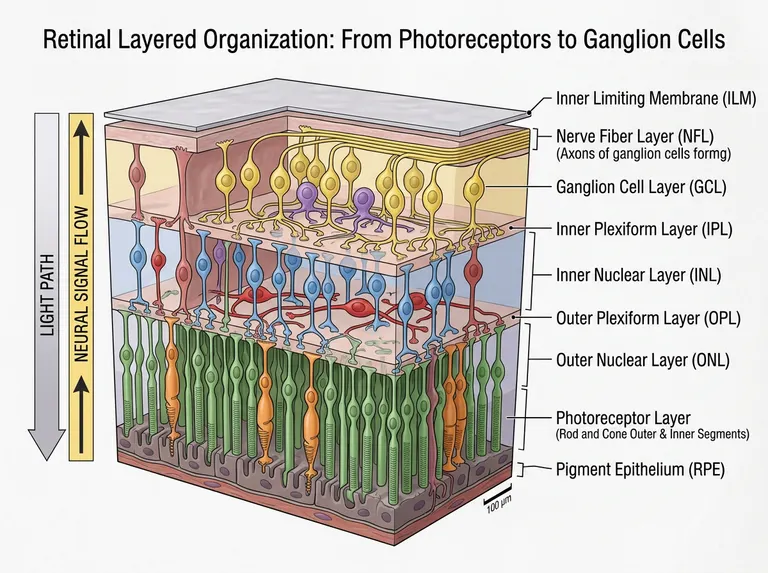
A cut block of retina labelled from the inner limiting membrane down to the pigment epithelium, with cell bodies and processes drawn in their own layers and two opposing arrows showing that light and signal travel in opposite directions.
Prompt
Create a scientific figure about: Retina layered organization from photoreceptors to ganglion cells. Visual style: Clean Vector. Requirements: publication-ready scientific quality, clear labels and directional arrows where appropriate, avoid cartoon or stock-photo look, composition optimized for research papers and academic slides.
What this template is
The figure makes the inverted architecture of the retina obvious. Light crosses the inner limiting membrane, the axon layer and every tier of cell bodies before it is absorbed in the photoreceptor segments pressed against the pigment epithelium. The signal then travels the other way: photoreceptors feed bipolar cells in the inner nuclear layer through one synaptic band, those cells feed ganglion cells through the second, and ganglion axons gather into the fibre layer and leave the eye. A reader should be able to say why light must pass the neurons first.
Elements to label
Limiting membrane and fibre layer
A thin sheet on the innermost face with bundled ganglion cell axons running beneath it.
Ganglion cell layer
Cell bodies in a single tier, dendrites descending into the inner synaptic band and axons turning inward.
The two plexiform layers
Draw both as synapse-dense bands that carry processes but no cell bodies of their own.
Inner nuclear layer cells
Bipolar cells span the layer, with horizontal cells toward its outer edge and amacrine cells toward the inner one.
Outer nuclear layer and segments
Photoreceptor nuclei fill the layer, with rod and cone inner and outer segments drawn below in separate colours. Separate rods from cones.
Pigment epithelium
A single outermost tier against the segment tips, with the interdigitation between them shown.
Two direction arrows
One arrow down for the light path and one up for signal flow, kept in clearly different colours. Place them outside the block.
Scale bar
A bar in the lower corner that matches the layer thicknesses actually drawn in the block.
Where it is used
- Paper mechanism figure
- Course handout
- Defense slides
- Academic poster
What reviewers look for
Cells in their proper tier
Horizontal cell processes belong in the outer synaptic band and amacrine cells near the inner one. The sample mixes an amacrine-like cell into the ganglion layer; call it displaced or move it back.
Müller glia are missing
Müller cells span the retina from the inner limiting membrane to the outer nuclear layer and form its scaffold. Their absence is immediately visible in any glial or injury study. Add them if glia matter to your text.
Truncated and stray text
The parenthetical under the fibre layer breaks off mid-word in the sample, and a pale fragment of text sits inside the block. Clear both before the figure travels with a manuscript.
Scale bar against thickness
Layer thickness differs greatly between the macula and the periphery, so a printed bar must match the region drawn, and the caption should say which region that is.
How to use it in Yila
- 1Pick a figure
- 2Describe your subject and the steps to stress
- 3Refine it in chat, then download the PNG
Tips
Do
- Highlight the cell type you study in a saturated colour and drop the rest to pale grey; the tiers read better that way.
- For foveal work, ask for the inner layers to be pushed aside into a pit rather than drawn flat across the block.
- Decide first whether the figure teaches circuitry or histology; for circuitry make the connections heavier than the somata.
Avoid
- Do not give both direction arrows the same colour; the whole point is that light and signal run opposite ways.
- Do not pack every tier with cells; the synaptic bands hold few somata, and filling them hides the layering.
- Do not stack every abbreviation against the right edge; a label column that long pushes the block out of proportion.
Questions
Can this go straight into a paper?
Treat it as a draft anatomical figure. Check the layer names and cell positions, remove the truncated and stray text, and keep refining it in chat until the resolution and type size satisfy the journal. Name the retinal region in the caption.
Can elements in the figure be changed?
Not element by element, but you can keep refining it by chatting in Yila: add Müller glia, redraw it as a foveal section, thin the cells down to plain layer bands, or extend the block into the choroid. Change one thing per message so the tiers stay comparable.
What format is delivered?
An AI-generated PNG as a landscape layered block. It is not a vector graphic, so check that the layer abbreviations and the scale bar text stay legible before you reduce it to a single column. A taller frame also helps the thin tiers.
Is it free?
Browsing this page and viewing the sample cost nothing. Generating your own version in Yila consumes credits, and a new account receives 2,500 credits, enough to retune the block to your species or region across several rounds. Collect the relabelling you want before each new round.
I study degeneration. Can it show a diseased retina?
Yes. Ask for a thinned outer nuclear layer, shortened segments or an altered pigment epithelium, cut beside a healthy block so the layer labels line up and the two can be compared directly. Keep the layer names identical on both sides.
Can it be paired with a tomography image?
Ask for a grey-scale band alongside the block standing in for a cross-sectional scan, with the layer names aligned across both, which suits teaching which reflective band belongs to which tier. Say which scan modality you mean.