เทมเพลตภาพวิทยาศาสตร์ · กลไกและวิถีทางชีวภาพ · 4:3
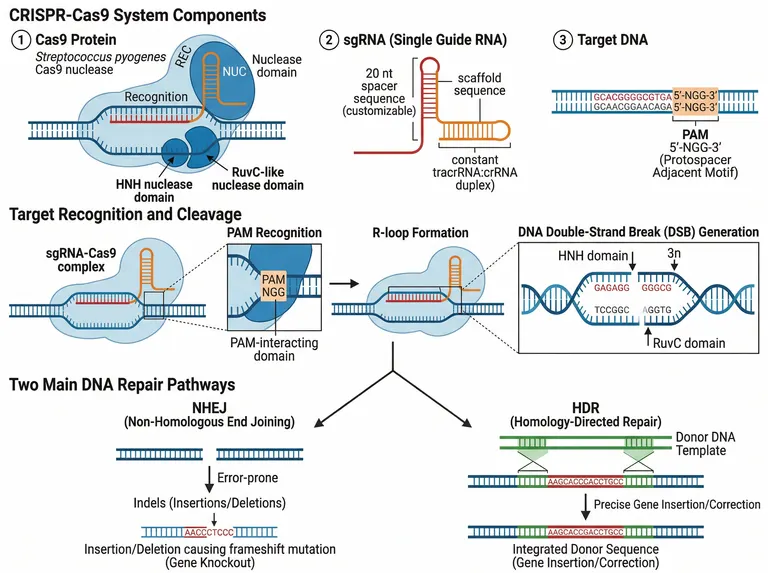
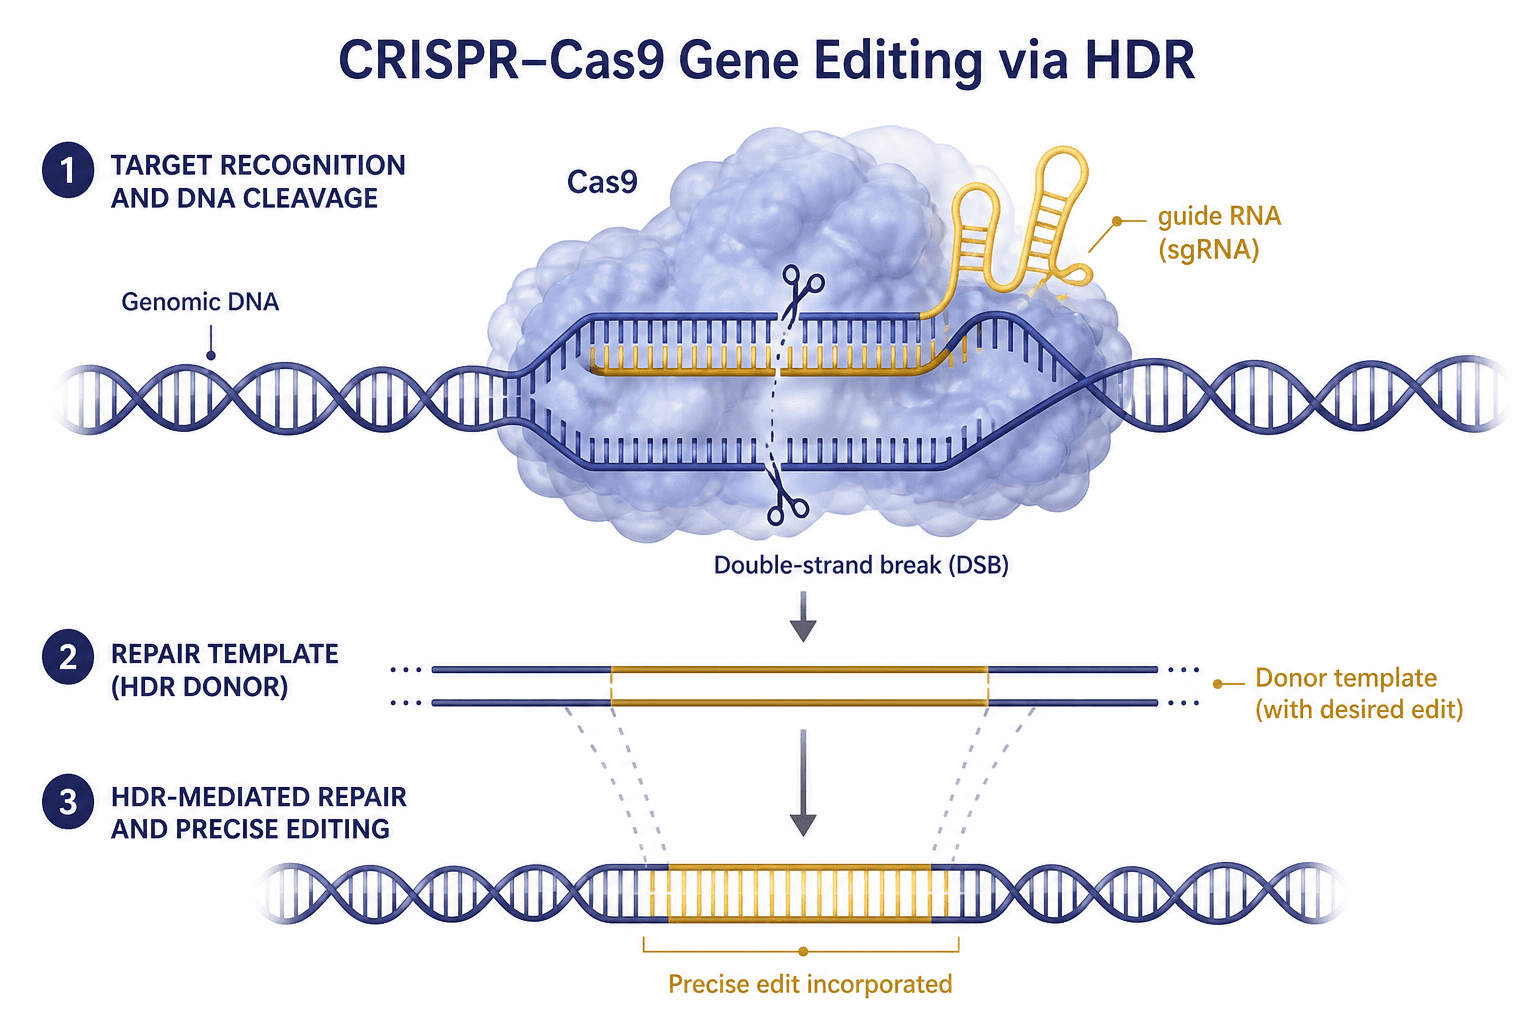
Cas9 Cleavage and Homology-Directed Repair Figure
Three numbered steps run down the page: Cas9 clamped onto the double helix with scissors on both strands, a donor template carrying the intended change, and a repaired helix that holds that change in place.
พรอมต์
Create a scientific figure about: CRISPR cut-and-repair mechanism. Visual style: Clean Vector. Requirements: publication-ready scientific quality, clear labels and directional arrows where appropriate, avoid cartoon or stock-photo look, composition optimized for research papers and academic slides.
เทมเพลตนี้คืออะไร
The figure splits editing into recognition and cleavage, template supply, and templated repair, each with a numbered heading on the left and its molecular picture on the right. The first step shows the guide RNA paired to its target inside the protein, with one cut on each strand. The second brings in a donor carrying the intended change. The third closes the break and leaves that stretch of sequence replaced. A reader should finish able to say where the change came from and exactly which interval of the genome now holds it.
องค์ประกอบที่ต้องระบุชื่อ
Cas9 protein body
The lobed protein clamped around the DNA in step one, soft in outline but still clearly distinct from the helix.
Guide RNA
A stem-looped single strand emerging to the right of the protein, labelled, in a colour unlike either DNA strand.
Paired target region
The unwound duplex inside the protein, one strand paired to the guide, with room left to mark the adjacent motif.
Cut sites
A pair of scissors on the upper and the lower strand at aligned positions, with the double-strand break named underneath.
Donor template
Two straight strands in step two whose middle segment carries the intended change, flanked by homology arms.
Alignment guides
Dashed lines from both ends of the donor down to the repaired sequence, marking where the replaced interval begins.
Repaired helix
Step three restores a continuous helix whose middle keeps the donor colour, bracketed below as the incorporated edit.
Step headings
Numbered circles with a short capitalised heading beside each, set to the left of their own molecular picture.
มักใช้ที่ไหน
- Paper mechanism figure
- Course handout
- Defense slides
- Academic poster
สิ่งที่ผู้ประเมินจะดู
Only one repair route is drawn
Cells more often rejoin a break by non-homologous end joining, yet only the templated route appears here. Any claim about editing efficiency looks one-sided without the competing pathway and the indels it leaves.
Cut position and the motif
The cut falls a fixed distance upstream of the protospacer-adjacent motif, but that motif is not drawn anywhere, so nobody can judge the target choice. Adding it matters far more than any decorative change.
Homology arms are unlabelled
The flanking segments that match the genome govern repair efficiency, and here they are only implied by the dashed lines. Give their actual length both in the methods and in this figure's caption.
Repair is not guaranteed
Step three shows a clean, precise edit, whereas in a real population only a fraction of cells reach that outcome. Say in the caption that the panel depicts the ideal case at a single allele.
วิธีใช้ใน Yila
- 1เลือกภาพ
- 2อธิบายสิ่งที่คุณศึกษาและขั้นตอนที่ต้องการเน้น
- 3ปรับแก้ต่อผ่านแชต แล้วดาวน์โหลดไฟล์ PNG
คำแนะนำ
ควรทำ
- Mark the adjacent motif and the cut position in step one; it is the first detail a reviewer checks on a figure like this.
- Give the donor's middle segment exactly the colour it keeps in step three, so the change can be tracked by eye.
- For a single-base edit, shrink the changed interval to one small mark rather than drawing it as a long replaced block.
ควรเลี่ยง
- Do not add a second symbol for cleavage beside the scissors; one event should carry just one visual convention.
- Do not draw the donor strands thicker than the genomic ones, because that difference reads as duplex against single strand.
คำถามที่พบบ่อย
Can this go straight into a paper?
Use it as the starting point for a mechanism panel. It is an AI-generated raster image, so add the adjacent motif and the homology arm lengths, state plainly that only one repair route is drawn, and then refine type sizes and line weights in Yila to match your journal's requirements.
Can elements in the figure be changed?
Not element by element, but you can keep refining it by chatting in Yila: add a branch for end joining, swap the donor for a single-stranded oligonucleotide, or redraw the whole sequence as base editing or prime editing, then generate a new version from that description.
What format is delivered?
An AI-generated PNG image in a 4:3 landscape layout. It is not a vector graphic, so the base-pairing rungs and the smaller labels blur together once the image is reduced; always check it at the size a handout or a paper column will actually give it.
Is it free?
Viewing this page and the sample figure costs nothing. Generating a version in Yila consumes credits, and a new account receives 2,500 credits, which is enough to try several wordings of the three steps, donor forms and palettes before refining one of them.
I make knockouts rather than precise edits. Can it be adapted?
Yes. Keep recognition and cleavage exactly as they are, replace step two with the break being rejoined directly, and make step three a sequence carrying an indel and a premature stop codon, which turns the page into a loss-of-function schematic.
Can I keep only the first step?
Ask for the protein, the guide RNA, the paired region and the cut sites alone, without the template and repair steps below. On its own it explains target recognition, and the base-pairing region can then be enlarged for teaching.